네트워크 실습 3 - OSPF 라우팅 프로토콜(-> ABR, ASBR)
네트워크 OSPF 실습 및 영역을 지정해 ABR(Area Border Router), ASBR(AS Boundary Router)을 설정한다.
시나리오
Area 1
Serial line : 10.10.10.1-2/24
Router0 -> 10.10.10.1/24
- 내부 네트워크 GW : 192.168.10.1/24
- 내부 네트워크 PC 1대 : 192.168.10.10/24
- Loopback : 120.120.120.1/24
ABR (Area 1 <—> Area 0)
- Router 1 -> 10.10.10.2/24, 20.20.20.1/24
Area 0
ASBR Router 3 -> 20.20.20.2/24, 30.30.30.2/24
- Loopback : 100.100.100.100/24
ABR (Area 0 <—> Area 2)
- Router 4 -> 30.30.30.3/24, 40.40.40.1/24
Area 2
Router 5 -> 40.40.40.2/24
- 내부 네트워크 GW : 172.16.10.1/24
- 내부 네트워크 PC 1대 : 172.16.10.10/24
- Loopback : 120.120.120.1/24
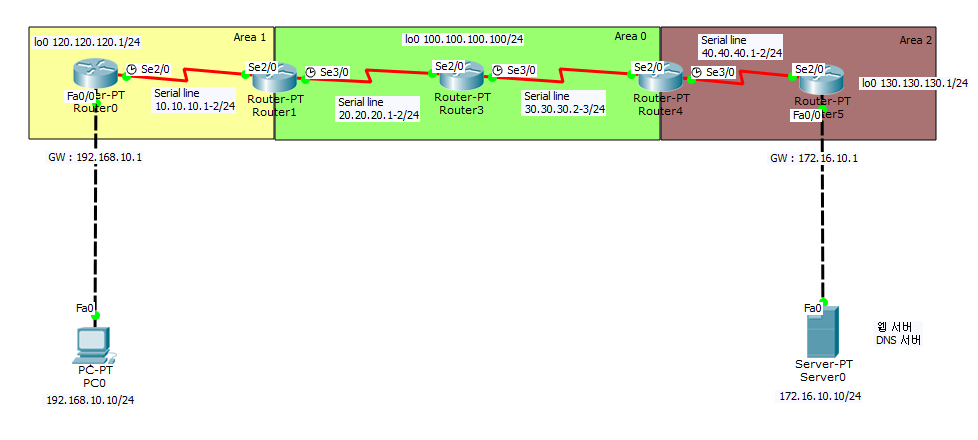
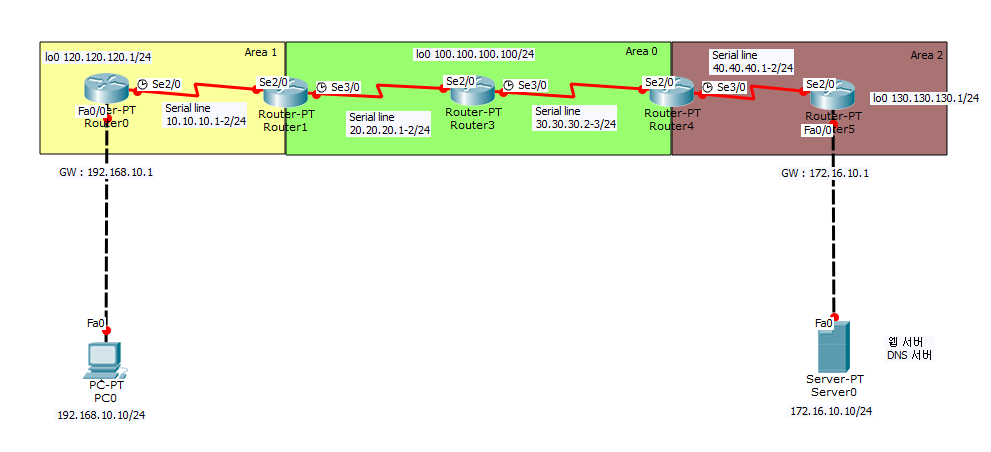 토폴로지 초기 상태
위 상태에서 설정을 마친 후 PC0에서 웹 서버에 접근해보겠다.
PC0 -> Router0 -> Router1 -> Router3 -> Router4 -> Router5 -> Server0 순으로 설정하겠다.
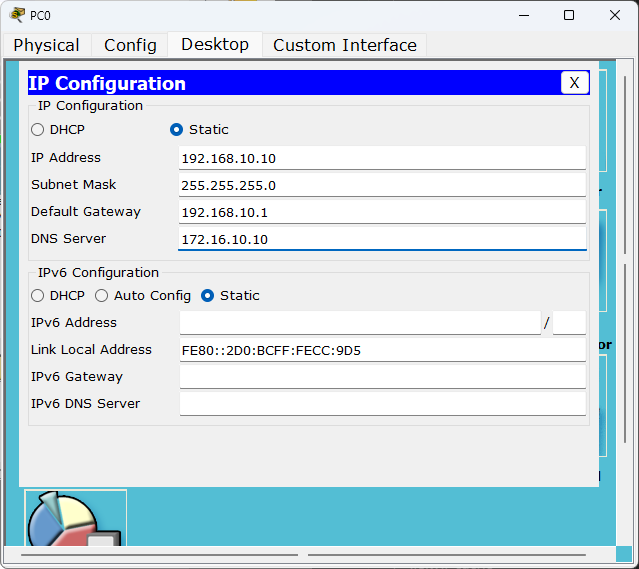 PC0 IP 설정
Router 설정
Router0 설정
1
2
3
4
5
6
7
8
9
10
11
12
13
14
15
16
17
18
19
20
21
22
23
24
25
26
27
28
29
30
31
32
33
34

Router>en
Router#configure terminal
Enter configuration commands, one per line.  End with CNTL/Z.
Router(config)#hostname R0
R0(config)#int fa0/0
R0(config-if)#ip addr 192.168.10.1 255.255.255.0
R0(config-if)#no shutdown

R0(config-if)#
%LINK-5-CHANGED: Interface FastEthernet0/0, changed state to up

%LINEPROTO-5-UPDOWN: Line protocol on Interface FastEthernet0/0, changed state to up

R0(config-if)#int se2/0
R0(config-if)#ip addr 10.10.10.1 255.255.255.0
R0(config-if)#no shutdown

R0(config-if)#
%LINK-5-CHANGED: Interface Loopback0, changed state to up

%LINEPROTO-5-UPDOWN: Line protocol on Interface Loopback0, changed state to up

R0(config-if)#ip addr 120.120.120.1 255.255.255.0

%LINK-5-CHANGED: Interface Serial2/0, changed state to down
R0(config-if)#exit
R0(config)#router ospf 101
R0(config-router)#network 192.168.10.0 0.0.0.255 area 1
R0(config-router)#network 10.10.10.0 0.0.0.255 area 1
R0(config-router)#network 120.120.120.0 0.0.0.255 area 1
R0(config-router)#exit
R0(config)#int lo0
Router1 설정
1
2
3
4
5
6
7
8
9
10
11
12
13
14
15
16
17
18
19
20
21
22
23
24
25
26

Router>enable
Router#configure terminal
Enter configuration commands, one per line.  End with CNTL/Z.
Router(config)#hostname R1
R1(config)#interface se2/0
R1(config-if)#ip addr 10.10.10.2 255.255.255.0
R1(config-if)#no shutdown

R1(config-if)#
%LINK-5-CHANGED: Interface Serial2/0, changed state to up

R1(config-if)#
%LINEPROTO-5-UPDOWN: Line protocol on Interface Serial2/0, changed state to up

R1(config-if)#interface se3/0
R1(config-if)#ip addr 20.20.20.1 255.255.255.0
R1(config-if)#no shutdown

%LINK-5-CHANGED: Interface Serial3/0, changed state to down
R1(config-if)#exit
R1(config)#router ospf 1010
R1(config-router)#network 10.10.10.0 0.0.0.255 area 1
R1(config-router)#network 20.20.20.0 0.0.0.255 area 0
R1(config-router)#end
Router3 설정
1
2
3
4
5
6
7
8
9
10
11
12
13
14
15
16
17
18
19
20
21
22
23
24
25
26
27
28
29
30
31
32

Router>enable
Router#conf t
Enter configuration commands, one per line.  End with CNTL/Z.
Router(config)#hostname R3
R3(config)#interface se2/0
R3(config-if)#ip addr 20.20.20.2 255.255.255.0
R3(config-if)#no shutdown

R3(config-if)#
%LINK-5-CHANGED: Interface Serial2/0, changed state to up

R3(config-if)#int lo0

R3(config-if)#
%LINK-5-CHANGED: Interface Loopback0, changed state to up

%LINEPROTO-5-UPDOWN: Line protocol on Interface Loopback0, changed state to up

R3(config-if)#ip addr 100.100.100.100 255.255.255.0
R3(config-if)#int se3/0
R3(config-if)#ip addr 30.30.30.2 255.255.255.0
R3(config-if)#no shutdown

%LINK-5-CHANGED: Interface Serial3/0, changed state to down
R3(config-if)#exit
R3(config)#router ospf 100
R3(config-router)#network 20.20.20.0 0.0.0.255 area 0
R3(config-router)#network 30.30.30.0 0.0.0.255 area 0
R3(config-router)#network 100.100.100.0 0.0.0.255 area 0
R3(config-router)#end
Router4 설정
1
2
3
4
5
6
7
8
9
10
11
12
13
14
15
16
17
18
19
20
21
22
23
24
25
26
27

Router>enable
Router#configure terminal
Enter configuration commands, one per line.  End with CNTL/Z.
Router(config)#hostname R4
R4(config)#interface se2/0
R4(config-if)#ip addr 30.30.30.3 255.255.255.0
R4(config-if)#no shutdown

R4(config-if)#
%LINK-5-CHANGED: Interface Serial2/0, changed state to up

R4(config-if)#exit
R4(config)#
%LINEPROTO-5-UPDOWN: Line protocol on Interface Serial2/0, changed state to up

R4(config)#int se3/0
R4(config-if)#ip addr 40.40.40.1 255.255.255.0
R4(config-if)#no shutdown

%LINK-5-CHANGED: Interface Serial3/0, changed state to down
R4(config-if)#exit
R4(config)#router ospf 1002
R4(config-router)#network 30.30.30.0 0.0.0.255 area 0
R4(config-router)#network 40.40.40.0 0.0.0.255 area 2
R4(config-router)#end
Router5 설정
1
2
3
4
5
6
7
8
9
10
11
12
13
14
15
16
17
18
19
20
21
22
23
24
25
26
27
28
29
30
31
32
33
34
35
36
37
38
39

Router>enable
Router#conf t
Enter configuration commands, one per line.  End with CNTL/Z.
Router(config)#hostname
% Incomplete command.
Router(config)#hostname R5
R5(config)#int se2/0
R5(config-if)#ip addr 40.40.40.2 255.255.255.0
R5(config-if)#no shutdown

R5(config-if)#
%LINK-5-CHANGED: Interface Serial2/0, changed state to up

%LINEPROTO-5-UPDOWN: Line protocol on Interface Serial2/0, changed state to up

R5(config-if)#int lo0
%LINK-5-CHANGED: Interface Loopback0, changed state to up

%LINEPROTO-5-UPDOWN: Line protocol on Interface Loopback0, changed state to up

R5(config-if)#ip addr 130.130.130.1 255.255.255.0
R5(config-if)#exit
R5(config)#int fa0/0
R5(config-if)#ip addr 172.16.10.1 255.255.255.0
R5(config-if)#no shutdown

R5(config-if)#
%LINK-5-CHANGED: Interface FastEthernet0/0, changed state to up

%LINEPROTO-5-UPDOWN: Line protocol on Interface FastEthernet0/0, changed state to up

R5(config-if)#exit
R5(config)#router ospf 102
R5(config-router)#network 130.130.130.0 0.0.0.255 area 2
R5(config-router)#network 172.16.10.0 0.0.0.255 area 2
R5(config-router)#network 40.40.40.0 0.0.0.255 area 2
R5(config-router)#end
Server0을 DNS 서버이자 Web 서버로 구성하고 IP를 설정한다.
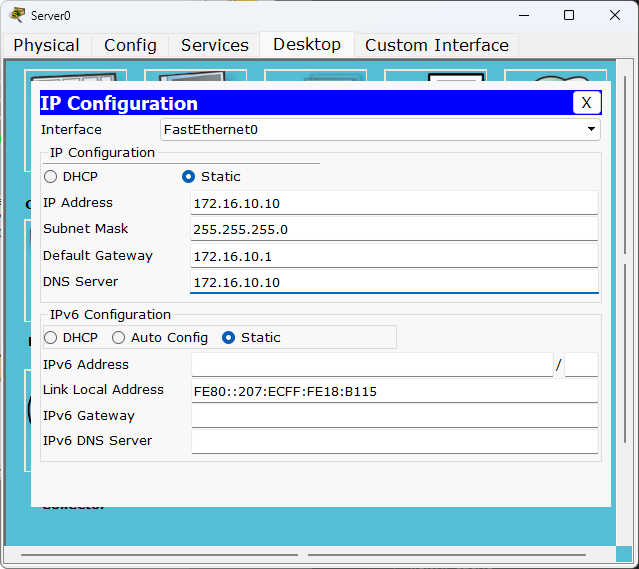 Server0 설정
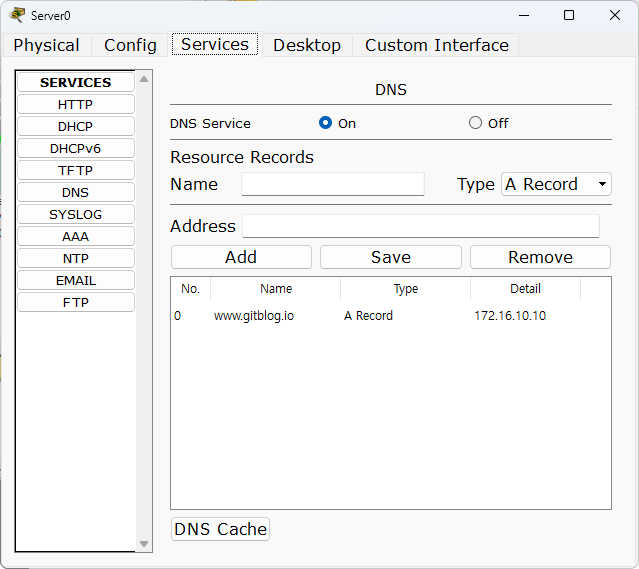 Server0 DNS 설정
이제 PC0에서 웹 서버에 접근한다.
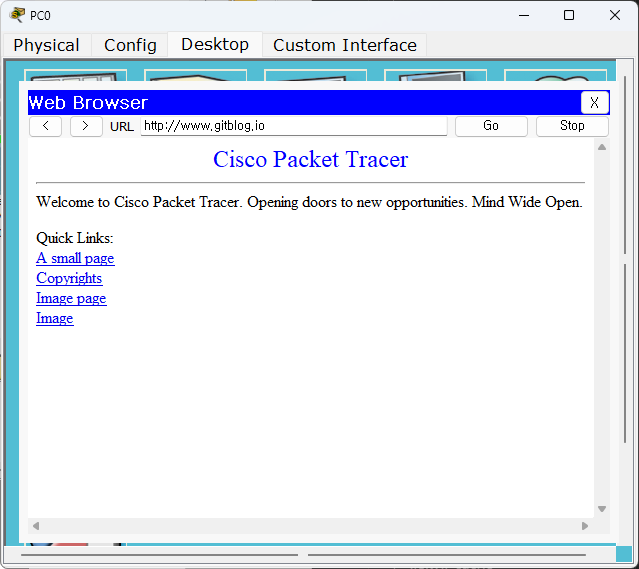 PC0에서 웹 서버 접근
PC0에서 Server0에 접근하는 과정을 tracert 명령어를 통해 출력해보겠다
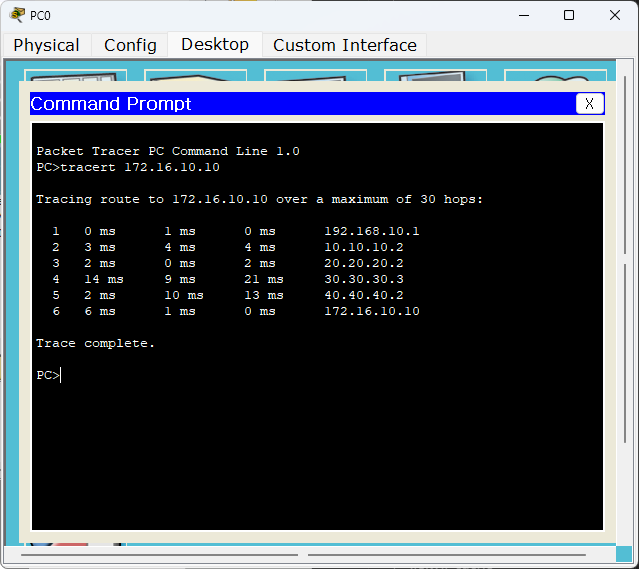 PC0 tracert 출력
이제 토폴로지 전체를 완성했다.
 토폴로지 구성 완료
이 기사는 저작권자의 CC BY 4.0 라이센스를 따릅니다.