리눅스 실습문제 3
Bastion Host 구성 - HAProxy 서버(라운드로빈 부하 분산), Apache 웹서버, MariaDB 서버 등
시나리오
1
2
3
4
5
6
7
8
centos8 => 10.10.10.10/24
centos8-2 => 10.10.10.20/24

win2003-1 => 10.10.10.30/24

centos7 NGW
    공인망 192.168.1.111
    사설망 GW 10.10.10.1
centos8,8-2,win2003-1 웹서버 설치
haproxy 외부에서 접속 단 front 단 https://192.168.1.111
mariadb-server 설치 복제서버
haproxy 이용해서 로드벨런서 생성해서 확인 단(centos8 / centos8-2) 방화벽 해제…
실습 환경 구축
CentOS7 (NGW;NAT GateWay), CentOS8 랜카드 설정, CentOS8-2 랜카드 설정
Bastion Host를 구축하기 위해 서버들이 존재하는 internal 네트워크(사설망)과 외부 인터넷(인터넷의 모든 컴퓨터들)과의 통신을 위한 공인 IP(가상의 공인 IP)로 설정하기 위해서는 2개의 랜카드가 필요하기 때문에 랜카드를 추가해준다.
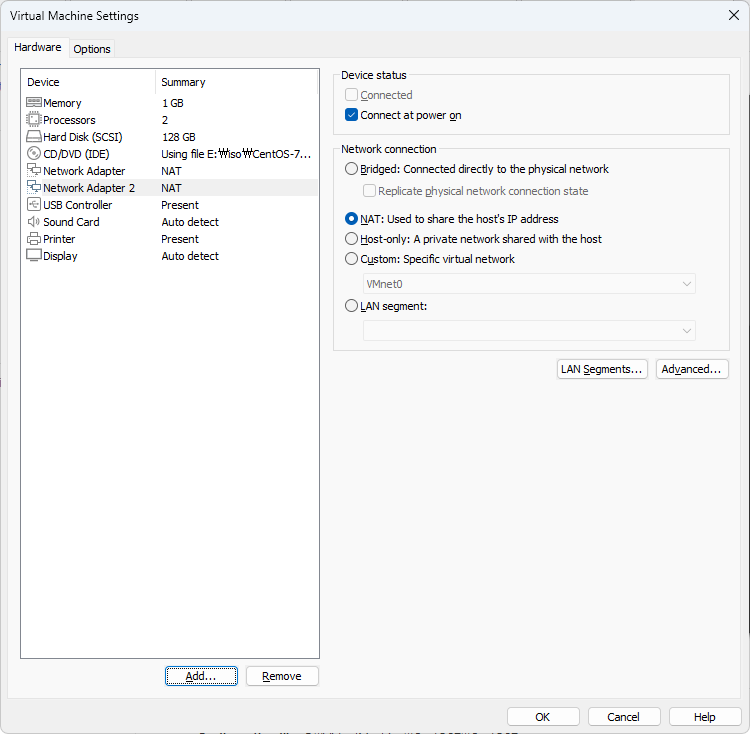 NAT 추가
로그인 후 hostnamectl 명령어로 localhost라는 이름을 ngw로 변경한다.
1
2
[root@localhost ~]# hostnamectl set-hostname ngw
[root@localhost ~]# exit
다시 로그인하면 호스트 네임이 바뀐다.
기존에 장착된 랜카드 이름은 ‘ens33’, 장착한 랜카드를 설정하기 전에 랜카드의 이름을 확인하기 위해 ip a or ip addr을 입력한다.
1
2
3
4
5
6
7
8
9
10
11
12
[root@ngw ~]# ip a

...
ensXX
...
...
ens33
...

# 이름 확인

[root@ngw ~]# nmtui
 nmtui ens36
CentOS7 버전은
systemctl restart network이라는 명령어로 전체 랜카드들을 재시작할 수 있다. {3: .prompt-tip }
정석은 nmcli con up ens33, nmcli con up ens36을 연달아 입력하는 것이다.
현재 다른 내부망 컴퓨터 CentOS8(10.10.10.10/24), CentOS8-2(10.10.10.20/24), win2003-1(10.10.10.30/24)는 통신이 안되는 상태이기 때문에, Masquerading을 해주기 위해 방화벽을 활성화 한다.
systemctl start firewalld && systemctl enable firewalld를 한 번에 실행하기 위해 systemctl enable --now firewalld 명령어를 입력
1
[root@ngw ~]# systemctl enable --now firewalld
내부망과 공인망을 분리해주기 전 확인하고, 내-외부를 분리해주겠다.
1
2
3
4
5
6
7
8
9
10
11
12
13
[root@ngw ~]# firewall-cmd --get-active-zones
public
  interfaces: ens33 ens36

# 분리
[root@ngw ~]# nmcli c mod ens33 connection.zone external
[root@ngw ~]# nmcli c mod ens36 connection.zone internal

[root@ngw ~]# firewall-cmd --get-active-zones
internal
  interfaces: ens36
external
  interfaces: ens33
이제 마스커레이딩을 해주기 위해서 다음 명령어를 입력한다.
1
2
3
4
5
6
7
8
9
10
11
12
13
14
15
16
17
18
19
20
21
22
[root@ngw ~]# firewall-cmd --permanent --add-masquerade --zone=external
...
success

# 적용
[root@ngw ~]# firewall-cmd --reload

# 확인
[root@ngw ~]# firewall-cmd --zone=external --list-all
external (active)
  target: default
  icmp-block-inversion: no
  interfaces: ens33
  sources:
  services: ssh
  ports:
  protocols:
  masquerade: yes # 적용 완료
  forward-ports:
  source-ports:
  icmp-blocks:
  rich rules:
Bastion Host에서 ssh로 원격 접속하기 위해 ssh-keygen 명령어로 rsa키를 생성한다.
1
2
3
4
5
6
7
8
9
10
11
12
13
14
15
16
17
18
19
20
21
22
[root@ngw ~]# ssh-keygen
Generating public/private rsa key pair.
Enter file in which to save the key (/root/.ssh/id_rsa): # Enter
Created directory '/root/.ssh'.
Enter passphrase (empty for no passphrase): # Enter
Enter same passphrase again: # Enter
Your identification has been saved in /root/.ssh/id_rsa.
Your public key has been saved in /root/.ssh/id_rsa.pub.
The key fingerprint is:
SHA256:fa9f4AuM0uoDTKmeGzpHOzv/tB/PIZnJcEQI3nwZXio root@ngw
The key's randomart image is:
+---[RSA 2048]----+
|      .. .o .    |
|     . o.o =     |
|      ..E *      |
|      o  =       |
|     +  S o . .  |
|    o o  = B o . |
|   o.o .o X + o .|
|  ..B. ..+ = + o |
|  .oo*.o=o. +.o  |
+----[SHA256]-----+
1
2
3
[root@ngw ~]# cd ~/.ssh
[root@ngw .ssh]# ls
id_rsa  id_rsa.pub
키가 ~/.ssh 디렉토리 안에 생성되었다.
키 생성을 완료했으니 내부망 컴퓨터에 키를 복사하기 전 CentOS8, CentOS8-2가 켜져있고, IP 설정이 완료되어야 한다.
CentOS8 IP 설정
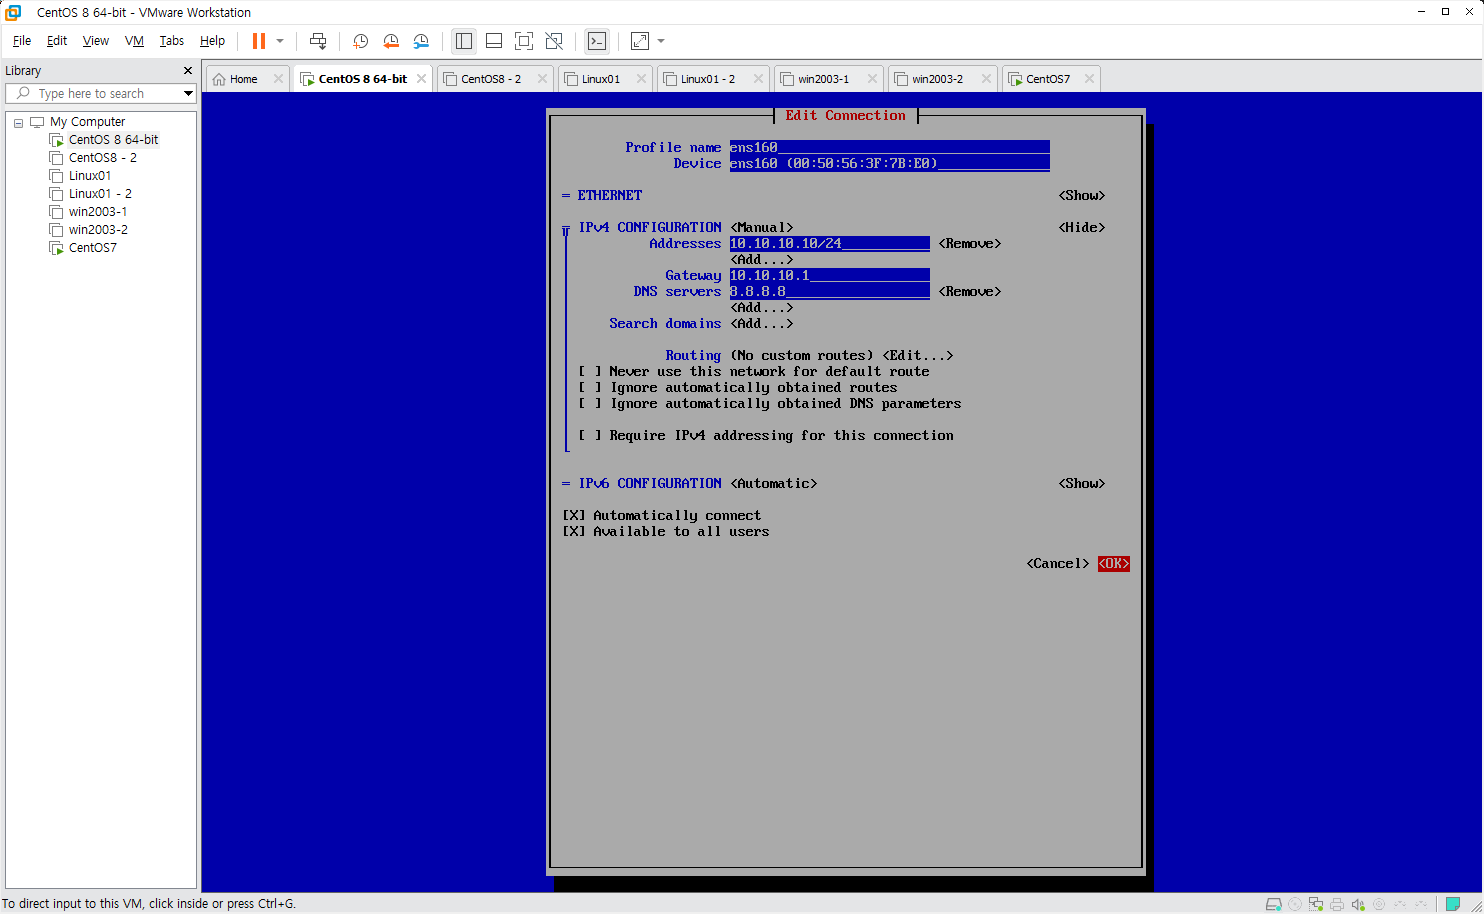 CentOS8 nmtui
1
[root@centos8 ~]# nmcli con up ens160
CentOS8-2 IP 설정
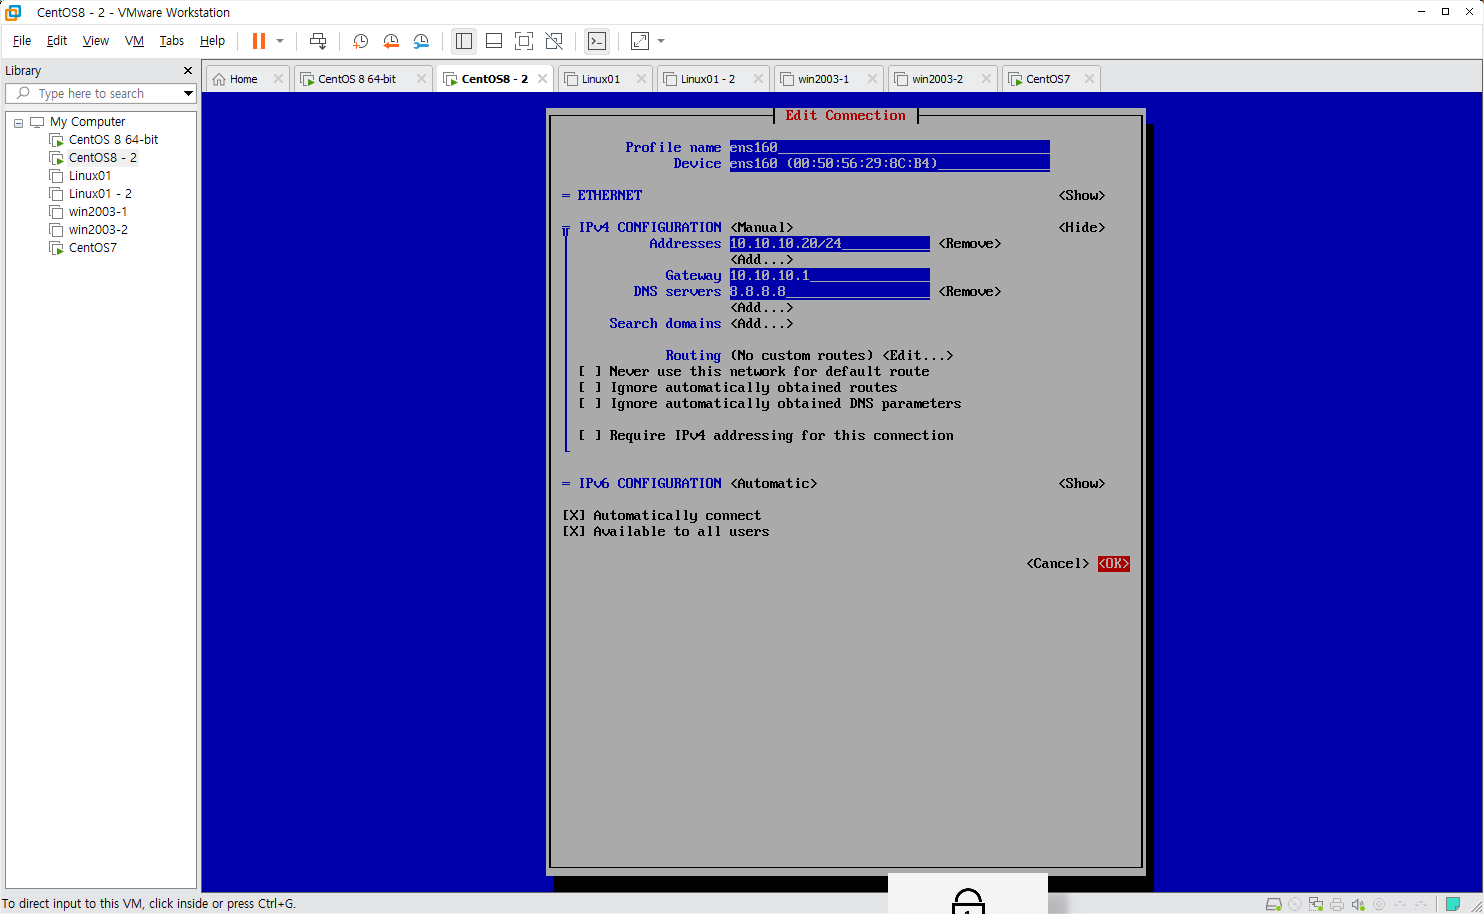 CentOS8 nmtui
1
[root@centos8-2 ~]# nmcli con up ens160
이제 ssh-copy-id 명령어로 ssh 키를 복사하겠다.
1
2
3
4
5
6
7
8
9
10
11
12
13
14
15
16
17
18
19
20
21
22
23
24
25
26
27
28
29
[root@ngw .ssh]# ssh-copy-id 10.10.10.10
/usr/bin/ssh-copy-id: INFO: Source of key(s) to be installed: "/root/.ssh/id_rsa.pub"
The authenticity of host '10.10.10.10 (10.10.10.10)' can't be established.
ECDSA key fingerprint is SHA256:STBE61BxkMnkxeEbs3SFRI9CK09vBMWCdckwCRObvng.
ECDSA key fingerprint is MD5:65:6d:0d:59:7c:2e:be:d6:45:df:d7:bc:4b:1e:ab:fd.
Are you sure you want to continue connecting (yes/no)? yes # Enter
/usr/bin/ssh-copy-id: INFO: attempting to log in with the new key(s), to filter out any that are already installed
/usr/bin/ssh-copy-id: INFO: 1 key(s) remain to be installed -- if you are prompted now it is to install the new keys
root@10.10.10.10's password: #111111

Number of key(s) added: 1

Now try logging into the machine, with:   "ssh '10.10.10.10'"
and check to make sure that only the key(s) you wanted were added.

[root@ngw .ssh]# ssh-copy-id 10.10.10.20
/usr/bin/ssh-copy-id: INFO: Source of key(s) to be installed: "/root/.ssh/id_rsa.pub"
The authenticity of host '10.10.10.20 (10.10.10.20)' can't be established.
ECDSA key fingerprint is SHA256:STBE61BxkMnkxeEbs3SFRI9CK09vBMWCdckwCRObvng.
ECDSA key fingerprint is MD5:65:6d:0d:59:7c:2e:be:d6:45:df:d7:bc:4b:1e:ab:fd.
Are you sure you want to continue connecting (yes/no)? yes # Enter
/usr/bin/ssh-copy-id: INFO: attempting to log in with the new key(s), to filter out any that are already installed
/usr/bin/ssh-copy-id: INFO: 1 key(s) remain to be installed -- if you are prompted now it is to install the new keys
root@10.10.10.20's password: #111111

Number of key(s) added: 1

Now try logging into the machine, with:   "ssh '10.10.10.20'"
and check to make sure that only the key(s) you wanted were added.
이제 ssh 명령어로 키인증을 통해 비밀번호를 묻지 않고 원격 로그인이 원활히 진행될 것이다.
그 전에 /etc/hosts를 수정해 별칭으로 로그인해보겠다.
1
[root@ngw ~]# vim /etc/hosts
1
2
3
4
5
6
7
127.0.0.1   localhost localhost.localdomain localhost4 localhost4.localdomain4
::1         localhost localhost.localdomain localhost6 localhost6.localdomain6
10.10.10.10     web01
10.10.10.20     web02
10.10.10.30     web03

:wq
ssh web01와 ssh web02를 입력해 로그인이 가능해졌다.
웹서버 구축
웹 서버와 MariaDB 패키지를 설치한다. (feat. vim)
1
2
3
4
5
[root@centos8 ~]# yum -y install vim httpd mariadb-server

# 각 가상머신에서 실행

[root@centos8-2 ~]# yum -y install vim httpd mariadb-server
웹 서버 문서들의 기본 경로인 /var/www/html
1
2
3
4
5
6
7
8
9
[root@centos8 ~]# cd /var/www/html

[root@centos8 html]# echo web01 site centos8 > index.html

# 각 가상머신에서 진행

[root@centos8-2 ~]# cd /var/www/html

[root@centos8-2 html]# echo web01 site centos8-2 > index.html
각 머신의 웹 서버를 활성화
1
2
3
4
5
[root@centos8 ~]# systemctl enable --now httpd

# 각 가상머신에서 진행

[root@centos8-2 ~]# systemctl enable --now httpd
윈도우 서버에서도 웹 서버를 가동하기 전 먼저 IP 설정을 해주겠다.
 윈도우 IP 설정
설정 완료 후 파일 탐색기로 웹서버 기본 디렉토리로 이동한다.
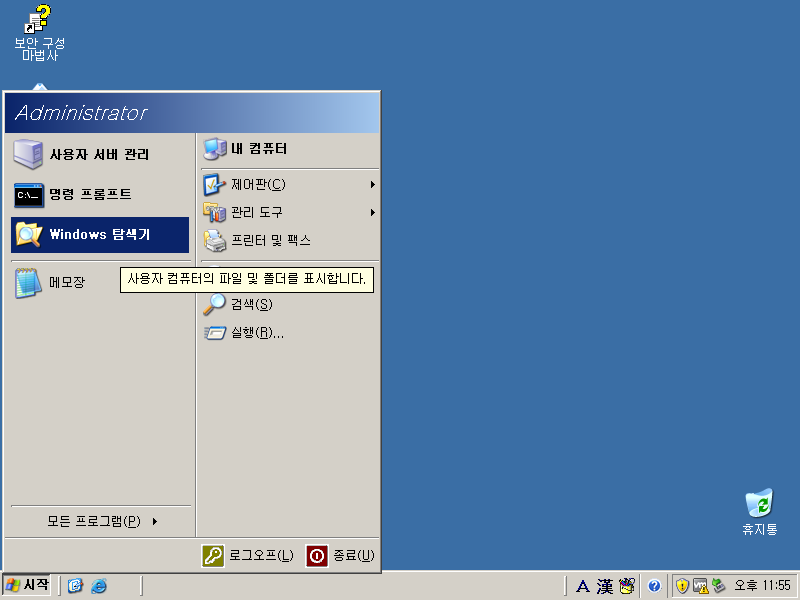 시작메뉴 파일탐색기
윈도우 2003 기준 웹서버 기본 경로는 C:\Inetpub\wwwroot이며, 해당 경로에 index.htm 파일을 생성하겠다.
 윈도우 서버 웹서버 경로
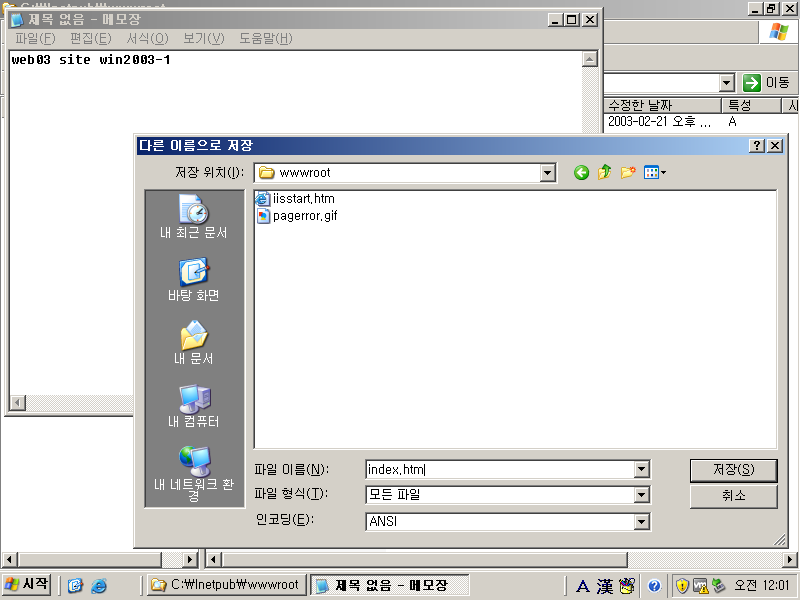 윈도우 서버 htm 파일 저장
각 서버를 CentOS7에서 정상 작동 확인
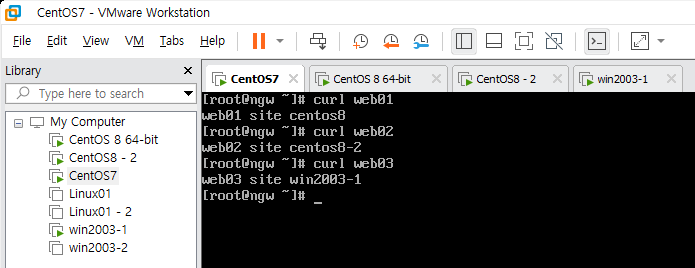 웹 서버 정상 작동
CentOS7 HAProxy 서버 구축
HAProxy 서버 패키지인 haproxy를 설치 후 haproxy configure 파일을 수정한다. /etc/haproxy/haproxy.cfg
1
2
3
4
5
6
[root@ngw ~]# yum -y install haproxy

...
...

[root@ngw ~]# vim /etc/haproxy/haproxy.cfg
1
2
3
4
5
6
7
8
9
10
11
12
13
14
15
16
17
18
19
20
21
22
23
24
25
26
27
 ...
 ...
 63 frontend  main *:80 # 80으로 수정
 64     acl url_static       path_beg       -i /static /images /javascript /stylesheets
 65     acl url_static       path_end       -i .jpg .gif .png .css .js
 66
 67     use_backend static          if url_static
 68     default_backend             app
 69
 70 #---------------------------------------------------------------------
 71 # static backend for serving up images, stylesheets and such
 72 #---------------------------------------------------------------------
 73 backend static
 74     balance     roundrobin
 75     server      static 127.0.0.1:4331 check
 76
 77 #---------------------------------------------------------------------
 78 # round robin balancing between the various backends
 79 #---------------------------------------------------------------------
 80 backend app
 81     balance     roundrobin
 82     server  app1 10.10.10.10:80 check   # 수정
 83     server  app2 10.10.10.20:80 check   # 수정
 84     server  app3 10.10.10.30:80 check   # 수정
~
~
:wq
저장 후 HAProxy를 가동하기 전, firewalld를 활성화했는데 포트가 열려있지 않다면 외부에서 Bastion Host에 공인 IP에 접근을 할 수 없을 것이다.
현재 NAT의 방화벽 상태를 확인하고, 해당 서비스(http)를 활성화하겠다.
1
2
3
4
5
6
7
8
9
10
11
12
13
14
15
16
17
18
19
20
21
22
23
24
25
26
27
28
29
30
31
32
33
34
[root@ngw ~]# firewall-cmd --list-all --zone=external
external (active)
  target: default
  icmp-block-inversion: no
  interfaces: ens33
  sources:
  services: ssh
  ports:
  protocols:
  masquerade: yes
  forward-ports:
  source-ports:
  icmp-blocks:
  rich rules:

[root@ngw ~]# firewall-cmd --permanent --add-service=http --zone=external
success
[root@ngw ~]# firewall-cmd --reload
success
[root@ngw ~]# firewall-cmd --list-all --zone=external
external (active)
  target: default
  icmp-block-inversion: no
  interfaces: ens33
  sources:
  services: http ssh
  ports:
  protocols:
  masquerade: yes
  forward-ports:
  source-ports:
  icmp-blocks:
  rich rules:
이제 HAProxy를 활성화하고 외부에서 확인해보자.
1
2
3
[root@ngw ~]# systemctl enable --now haproxy

[root@ngw ~]# systemctl status haproxy
haproxy 서비스는 활성화할 때 에러 메시지를 출력하지 않기 때문에 반드시
systemctl status haproxy명령어로 active 상태인지 확인하자. {3: .prompt-tip }
이제 가상의 외부 컴퓨터(Linux01; 192.168.1.10)에서 확인해보는데, Bastion Host의 방화벽만 켜져있고, 사설망 내의 웹 서버들의 방화벽은 켜져있지 않은 상태이다.
 외부 컴퓨터에서 확인
CentOS8을 MariaDB master 서버, CentOS8-2를 MariaDB slave 서버로 만들고 실시간 복제 및 DB 이중화
mariadb 한글이 깨지지 않도록 진행하고 master 서버와 slave 서버로 이중화하겠다.
먼저 MariaDB 설정 파일들이 있는 /etc/my.cnf.d/에 이동한다.
1
2
3
[root@centos8 ~]# cd /etc/my.cnf.d/
[root@centos8 my.cnf.d]# ls
auth_gssapi.cnf  client.cnf  enable_encryption.preset  mariadb-server.cnf  mysql-clients.cnf
client.cnf, mariadb-server.cnf, mysql-clients.cnf 파일을 수정한다.
1
[root@centos8 ~]# vim client.cnf
1
2
3
4
5
6
7
...
  6
  7 [client]
  8 default-character-set=utf8 # 수정
  9 # This group is not read by mysql client library,
...
:wq
1
[root@centos8 ~]# vim mysql-clients.cnf
1
2
3
4
5
6
7
8
9
10
11
12
13
14
15
16
17
18
19
20
21
22
23
24
25
  1 #
  2 # These groups are read by MariaDB command-line tools
  3 # Use it for options that affect only one utility
  4 #
  5
  6 [mysql]
  7 default-character-set=utf8 # 수정
  8 [mysql_upgrade]
  9
 10 [mysqladmin]
 11
 12 [mysqlbinlog]
 13
 14 [mysqlcheck]
 15
 16 [mysqldump]
 17 default-character-set=utf8 # 수정
 18 [mysqlimport]
 19
 20 [mysqlshow]
 21
 22 [mysqlslap]
 23

:wq
1
[root@centos8 ~]# vim mariadb-server.cnf
1
2
3
4
5
6
7
8
9
10
11
12
13
14
15
16
17
18
19
20
21
22
23
24
25
26
...
...
# instructions in http://fedoraproject.org/wiki/Systemd
[mysqld]
datadir=/var/lib/mysql
socket=/var/lib/mysql/mysql.sock
log-error=/var/log/mariadb/mariadb.log
pid-file=/run/mariadb/mariadb.pid
character-set-server=utf8           # 추가
collation-server=utf8_general_ci    # 추가
init_connect=set\ names\ utf8       # 추가
...

...
# MariaDB Master 서버 지정 -> 맨 아래로 이동 (shift + g)
...

...
# use this group for options that older servers don't understand
[mariadb-10.3]
log-bin=mysql-bin   # 추가
server-id=1         # 추가
binlog_format=row   # 추가
expire_logs_days=2  # 추가

:wq
cnf 파일을 수정하는 것은 끝났으니, mariadb-server를 활성화한다.
1
2
3
4
5
6
7
8
9
10
11
12
13
14
15
16
17
18
19
20
21
22
23
24
25
26
27
28
29
30
31
32
33
34
35
36
37
38
39
40
41
42
43
44
45
46
47
48
49
50
51
52
[root@centos8 ~]# systemctl enable --now mariadb

[root@centos8 ~]# mysql
Welcome to the MariaDB monitor.  Commands end with ; or \g.
Your MariaDB connection id is 11
Server version: 10.3.28-MariaDB-log MariaDB Server

Copyright (c) 2000, 2018, Oracle, MariaDB Corporation Ab and others.

Type 'help;' or '\h' for help. Type '\c' to clear the current input statement.

MariaDB [(none)]> status;
--------------
mysql  Ver 15.1 Distrib 10.3.28-MariaDB, for Linux (x86_64) using readline 5.1

Connection id:		10
Current database:
Current user:		root@localhost
SSL:			Not in use
Current pager:		stdout
Using outfile:		''
Using delimiter:	;
Server:			MariaDB
Server version:		10.3.28-MariaDB-log MariaDB Server
Protocol version:	10
Connection:		Localhost via UNIX socket
Server characterset:	utf8    # 문자셋 설정 성공
Db     characterset:	utf8    # 문자셋 설정 성공
Client characterset:	utf8    # 문자셋 설정 성공
Conn.  characterset:	utf8    # 문자셋 설정 성공
UNIX socket:		/var/lib/mysql/mysql.sock
Uptime:			12 min 21 sec

Threads: 7  Questions: 12  Slow queries: 0  Opens: 17  Flush tables: 1  Open tables: 11  Queries per second avg: 0.016
--------------

MariaDB [(none)]> show master status;
+------------------+----------+--------------+------------------+
| File             | Position | Binlog_Do_DB | Binlog_Ignore_DB |
+------------------+----------+--------------+------------------+
| mysql-bin.000002 |      342 |              |                  |
+------------------+----------+--------------+------------------+
1 row in set (0.000 sec)

MariaDB [(none)]> grant replication slave on *.* to 'slave_db'@'%' identified by '1234';
Query OK, 0 rows affected (0.000 sec)
# 복제 서버를 위한 master DB 설정

MariaDB [(none)]> grant all privileges on *.* to root@'%' identified by '4321';
Query OK, 0 rows affected (0.000 sec)
# 원격 접속을 위한 유저 추가 완료
master 서버 설정이 완료되었으니 slave 서버를 설정한다.
한글이 깨지지 않도록 위와 같게 /etc/my.cnf.d/client.cnf, /etc/my.cnf.d/mysql-clients.cnf의 수정은 동일하게 진행하지만, 마지막 /etc/my.cnf.d/mariadb-server.cnf의 맨 마지막 부분은 주의해서 적는다.
1
[root@centos8-2 ~]# vim mariadb-server.cnf
1
2
3
4
5
6
7
8
9
10
11
12
13
14
15
16
17
18
19
20
21
22
...
...
# instructions in http://fedoraproject.org/wiki/Systemd
[mysqld]
datadir=/var/lib/mysql
socket=/var/lib/mysql/mysql.sock
log-error=/var/log/mariadb/mariadb.log
pid-file=/run/mariadb/mariadb.pid
character-set-server=utf8           # 추가
collation-server=utf8_general_ci    # 추가
init_connect=set\ names\ utf8       # 추가
...

...
# use this group for options that older servers don't understand
[mariadb-10.3]
log-bin=mysql-bin   # 추가
server-id=2         # 추가 server id로 master와 slave를 구분한다.
binlog_format=row   # 추가
expire_logs_days=2  # 추가

:wq
master MariaDB의 복제 상태인 slave MariaDB를 구분할 수 있도록 마스터 DB에는 CREATE DATABASE test_db; 명령어를 입력해 DB를 생성하고, 슬레이브 DB에는 CREATE DATABASE test_db2; 명령어를 입력해 DB를 생성하겠다.
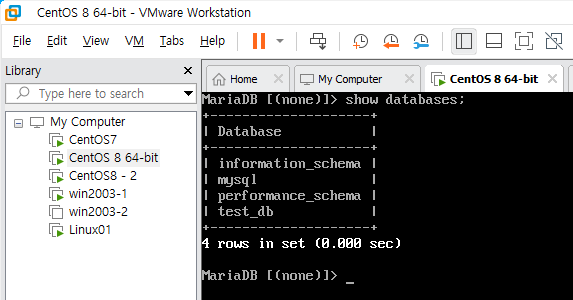 마스터 MariaDB 데이터베이스
1
2
3
4
5
6
7
8
9
10
11
12
# CentOS8

MariaDB [(none)]> show databases;
+--------------------+
| Database           |
+--------------------+
| information_schema |
| mysql              |
| performance_schema |
| test_db            |
+--------------------+
4 rows in set (0.001 sec)
1
2
3
4
5
6
7
8
9
10
11
12
13
# CentOS8-2

MariaDB [(none)]> show databases;
+--------------------+
| Database           |
+--------------------+
| information_schema |
| mysql              |
| performance_schema |
| test_db            |
| test_db2           |
+--------------------+
5 rows in set (0.001 sec)
복제된 DB(slave)에서 database를 생성해봤자 master와는 연관이 없다. 마스터 DB에서 test_db2라는 database를 생성하면 에러가 발생할 것이다.
그러니 가급적이면 Master DB에서 DDL(
CREATE,ALTER,DROP,TRUNCATE), DML(SELECT,INSERT,UPDATE,DELETE), DCL(GRANT,REVOKE,COMMIT,ROLLBACK)을 작성한다.
Slave DB에서는 조회 정도만 수행하는 것이 바람직하다.
DB Server 부하 분산 (feat. HAProxy)
DB 서버 부하 분산을 HAProxy를 이용해서 한다면 /etc/haproxy/haproxy.cfg를 다시 수정해줘야 한다.
vim /etc/haproxy/haproxy.cfg 실행
1
2
3
4
5
6
7
8
9
10
11
12
13
14
15
16
17
18
19
20
21
22
23
24
25
26
27
28
29
30
31
32
33
34
35
36
37
38
...
...
#---------------------------------------------------------------------
# common defaults that all the 'listen' and 'backend' sections will
# use if not designated in their block
#---------------------------------------------------------------------
defaults
    mode                    tcp       # 수정 (default: http)
    log                     global
    option                  httplog
    option                  dontlognull
...
...

# 거의 맨 아래 부분

...
...
#---------------------------------------------------------------------
# round robin balancing between the various backends
#---------------------------------------------------------------------
backend app
    mode        http                # 줄 추가
    balance     roundrobin
    server  app1 10.10.10.10:80 check
    server  app2 10.10.10.20:80 check
    server  app3 10.10.10.30:80 check

# 아래 frontend 부터 전부 추가

frontend mysql-in
    bind *:3306
    default_backend     mariadb_server

backend mariadb_server
    balance             roundrobin
    server      db01    10.10.10.10:3306 check
    server      db02    10.10.10.20:3306 check
적용 후 haproxy 서비스를 활성화하기 전
외부 인터넷에서는 웹 서버를 접근하거나 DB 서버에 대해 접근할 때, 방화벽 서버의 공인 IP를 해당 서비스(웹 서버와 DB 서버)인 줄 알고 있다.
간단히 이야기해서 SNAT(Source NAT)는 출발지 주소를 변경, DNAT(Destination NAT)는 도착지 주소를 변경하는 것이다.
DNAT는 포트포워딩과 같은 의미로 통하기도 한다.
현재 사설망의 방화벽은 꺼져있는 상태인데 활성화해주고, 해당 서비스(포트)를 열어주면 외부 인터넷에서 Bastion Host(Network GateWay)의 방화벽에서 한 번 인바운드 요청에 대한 보안을 검사하고, 내부 망에서 HAProxy로 DNAT할 때 해당 서비스만 활성화한다면 보안적인 부분을 강화할 수 있다.
지금까지는 테스트를 위해 방화벽을 꺼둔 상태였지만(Bastion Host인 CentOS7만 방화벽 가동 중), 사설망(CentOS8, CentOS8-2)의 방화벽을 활성화 해주도록 하겠다.
1
2
3
[root@centos8 ~]# systemctl enable --now firewalld

# 각 리눅스 서버에서 진행
방화벽에서 허용한 서비스 혹은 포트를 확인하기 위해 firewall-cmd --list-all 명령어를 입력한다.
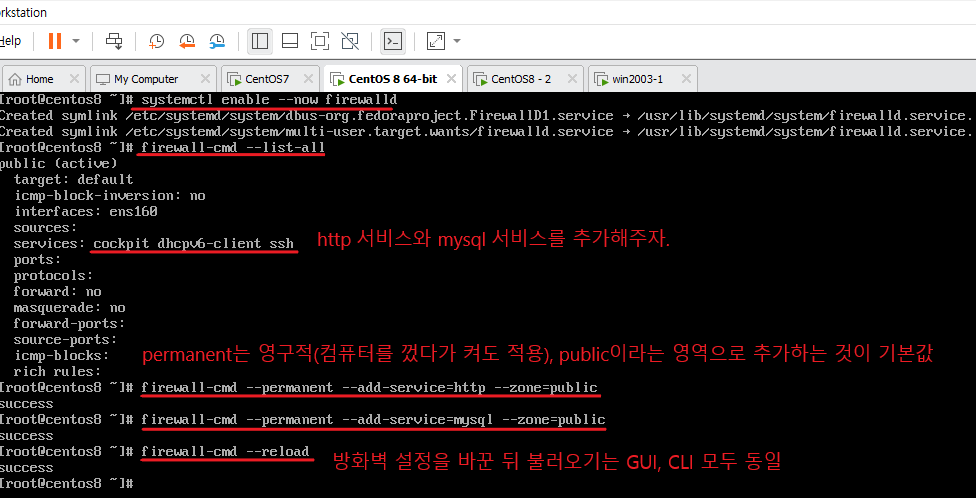 CentOS8 방화벽 활성화 및 서비스 추가
방화벽 컴퓨터(Bastion Host)의 외부망(zone=external)에 서비스를 추가하고, HAProxy 서비스를 활성화한다.
1
2
3
4
5
6
7
8
9
10
11
12
13
14
15
16
17
18
19
[root@ngw ~]# firewall-cmd --list-all --zone=external
external (active)
  target: default
  icmp-block-inversion: no
  interfaces: ens33
  sources:
  services: http ssh    # mysql 추가
  ports:
  protocols:
  masquerade: yes
  forward-ports:
  source-ports:
  icmp-blocks:
  rich rules:

[root@ngw ~]# firewall-cmd --permanent --add-service=mysql --zone=external
success
[root@ngw ~]# firewall-cmd --reload
success
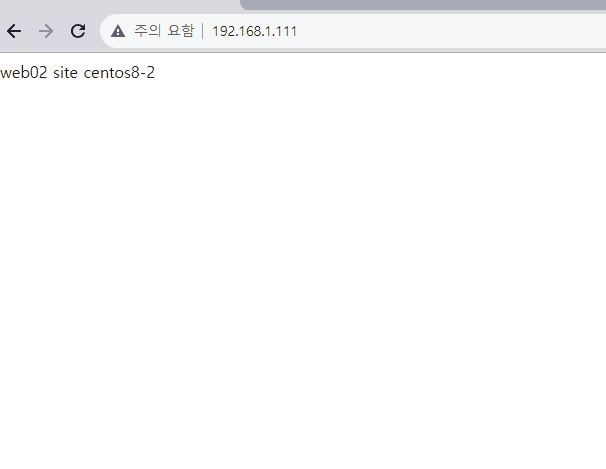
가상의 외부 인터넷 (192.168.1.XXX)에서 접근해보면 사설망 내의 서버 방화벽을 켜도 라운드로빈이 잘 적용되는 것을 확인할 수 있다.
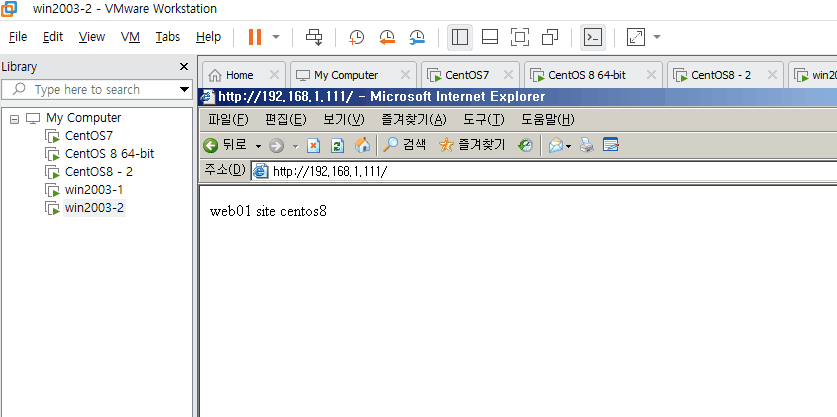 win2003-2에서 웹서버 라운드로빈 확인
이제 HAProxy를 이용해 라운드로빈 방식으로 DB 서버에 부하를 분산하는 것을 테스트하기 위해서, 두 대의 DB 서버에 로그인하기 위한 사용자를 생성하는 것이다.
일반적으로 root 사용자에 대한 권한은 주지 않기 때문에 새로운 유저를 생성한다.
testuser라는 사용자에게 test_db에 대한 모든 권한을 주며, 192.168.1.XXX에서 접근할 때 비밀번호 ‘4321’을 입력하며 로그인할 수 있도록 한다.
1
2
3
4
5
6
7
8
9
10
11
12
13
14
MariaDB [mysql]> grant all privileges on test_db.* to testuser@'%' identified by '4321';

MariaDB [mysql]> select user, host from user;
+----------+-----------+
| user     | host      |
+----------+-----------+
| slave_db | %         |
| testuser | %         |
| root     | 127.0.0.1 |
| root     | ::1       |
| root     | centos8   |
| root     | localhost |
+----------+-----------+
6 rows in set (0.000 sec)
이렇게 각 서버에 접속을 위한 사용자를 생성했다면 관련 권한을 적용시키기 위해 FLUSH PRIVILEGES; MariaDB 서버에 입력해야 한다.
1
2
MariaDB [(none)]> flush privileges;
Query OK, 0 rows affected (0.017 sec)
적용 후 가상의 외부 인터넷(192.168.1.XXX) 대역에서 접근해보고 만약 되지 않는다면, 서비스를 재시작해보자.
현재 HAProxy 서버를 통해 Bastion Host의 공인 IP인 192.168.1.111에 3306 포트를 통해 접속하면 라운드로빈 방식으로 CentOS8과 CentOS8-2의 DB 서버에 접근해 부하 분산을 할 것이다.
이것을 테스트해 보는 방법이 telnet을 이용하는 방식이 있다.
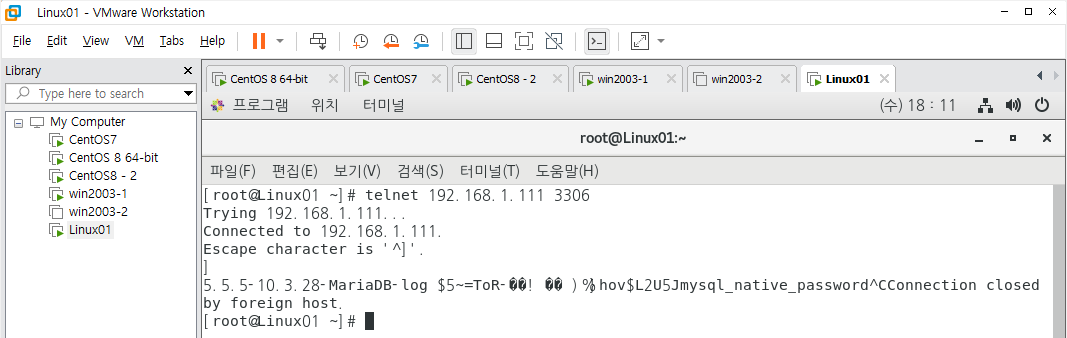 telnet을 이용한 접속 체크
위 사진과 같이 나왔다면 다음 명령어를 입력해 가상의 외부 인터넷에서 접속한다.
1
2
3
[root@Linux01 ~]# mysql -h 192.168.1.111 -u testuser -p
# 192.168.1.111이라는 호스트에 있는 DB 서버로 접근하는데
# testuser라는 사용자로 비밀번호를 사용해 접근한다는 의미이다.
정상적으로 접속되었다면 다음 status; 명령어를 입력해 확인해보고, 다음 사진을 주목한다.
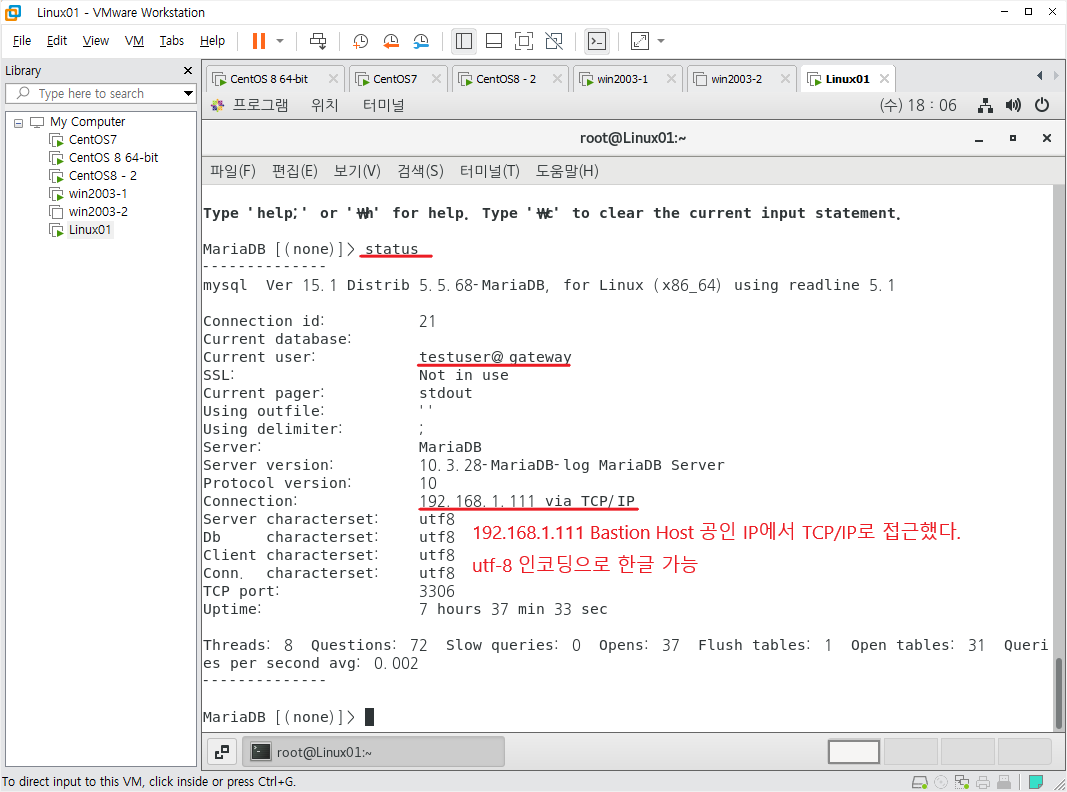 HAProxy를 활용한 부하 분산 접속 상태 확인
번외) HAProxy에 HTTPS로 접근 시 내부 웹 서버(HTTP)로 로드밸런싱
먼저 OS 자체 인증 파일을 만들어서 해당 파일의 경로를 /etc/haproxy/haproxy.cfg의 특정 부분에 입력해주면 된다. 먼저 openssl 명령어로 인증 파일을 생성하자.
자세히는 모르겠으나, 관련 패키지인 mod_ssl을 설치한다
yum -y install mod_ssl
인증 파일을 생성할 경로 /etc/pki/tls/certs에 이동한다.
1
2
3
4
5
6
7
8
9
10
11
12
13
14
15
16
17
18
19
20
21
[root@ngw ~]# cd /etc/pki/tls/certs
[root@ngw certs]# openssl req -x509 -nodes -newkey rsa:2048 -keyout /etc/pki/tls/certs/haproxy.pem -out /etc/pki/tls/certs/haproxy.pem -days 365
Generating a 2048 bit RSA private key
.................................................+++
...................+++
writing new private key to '/etc/pki/tls/certs/haproxy.pem'
-----
You are about to be asked to enter information that will be incorporated
into your certificate request.
What you are about to enter is what is called a Distinguished Name or a DN.
There are quite a few fields but you can leave some blank
For some fields there will be a default value,
If you enter '.', the field will be left blank.
-----
Country Name (2 letter code) [XX]:KR
State or Province Name (full name) []:Republic of Korea
Locality Name (eg, city) [Default City]:Seoul
Organization Name (eg, company) [Default Company Ltd]:KOSA
Organizational Unit Name (eg, section) []:Cloud
Common Name (eg, your name or your server's hostname) []:minyeokue.github.io
Email Address []:fnels154@gmail.com
Bastion Host(CentOS7)의 HAProxy 설정 파일 /etc/haproxy/haproxy.cfg를 수정한다.
vim /etc/haproxy/haproxy.cfg
1
2
3
4
5
6
7
8
9
10
11
12
13
14

...
#---------------------------------------------------------------------
# main frontend which proxys to the backends
#---------------------------------------------------------------------
frontend  main *:80
    acl url_static       path_beg       -i /static /images /javascript /stylesheets
    acl url_static       path_end       -i .jpg .gif .png .css .js
    bind *:443 ssl crt /etc/pki/tls/certs/haproxy.pem     # 추가
    use_backend static          if url_static
    default_backend             app
...

:wq
Bastion Host의 공인 IP로 443 포트를 통해 접근하면 HAProxy 서버가 사설망의 http 서버로 연결해야 한다.
firewall-cmd --list-all --zone=external 명령어로 Bastion Host의 외부 영역을 확인한다.
1
2
3
4
5
6
7
8
9
10
11
12
13
14
[root@ngw certs]# firewall-cmd --list-all --zone=external
external (active)
  target: default
  icmp-block-inversion: no
  interfaces: ens33
  sources:
  services: http mysql ssh
  ports:
  protocols:
  masquerade: yes
  forward-ports:
  source-ports:
  icmp-blocks:
  rich rules:
https 서비스를 추가해준다면 https로 들어온 요청을 웹 서버로 연결할 때 일반 http 웹 서버로 연결할 것이다.
1
2
3
4
[root@ngw certs]# firewall-cmd --permanent --add-service=https --zone=external
success
[root@ngw certs]# firewall-cmd --reload
success
HAProxy 서버를 재시작하고 에러가 없는지 확인한 뒤 가상의 외부망에서 HTTPS로 접근했을 때 어떻게 되는지 확인하자.
systemctl restart haproxy 입력 후 가상의 외부 인터넷으로 https://192.168.1.111로 접속해보자.
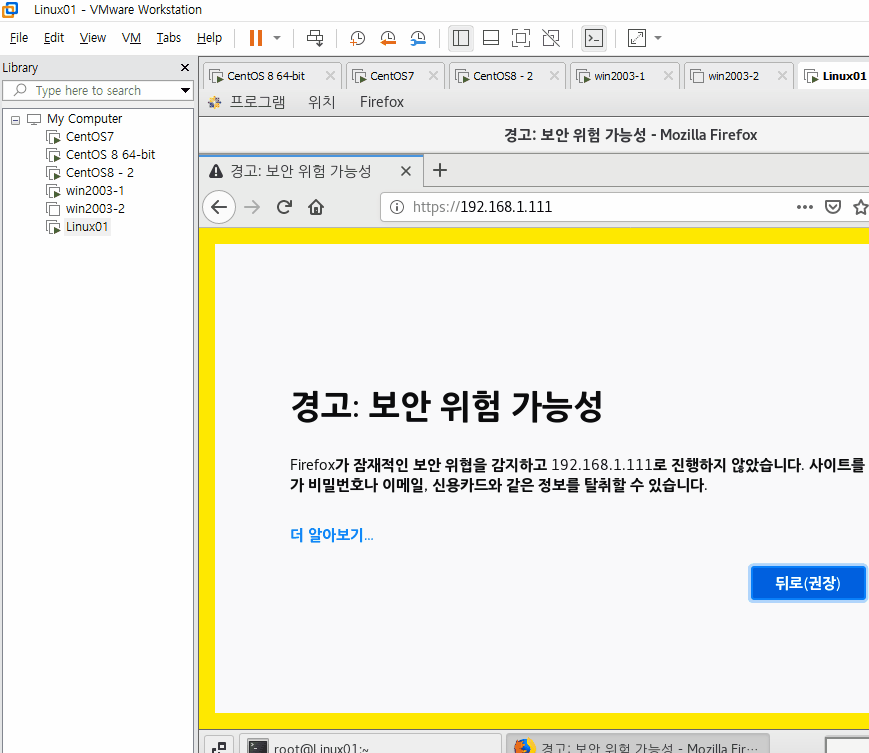 자체 인증서를 활용한 HAProxy DNAT 연결 로드밸런싱